Integrating with JUnit
Compatible with SpiraTest, SpiraTeam, SpiraPlan
The directions for using JUnit 5 and JUnit 4 are in different sections below:
Installing the JUnit 5 Extension
This section outlines how to install the Spira Extension for JUnit 5 onto a workstation so that you can then run automated JUnit tests against a Java application and have the results be recorded as test runs inside Spira. It assumes that you already have a working installation of Spira v5.0 or later. If you have an earlier version of Spira you will need to upgrade to at least v5.0 before trying to use this extension. You will also need to have at least version 5.0 of Junit. If you are using an earlier version, please visit www.junit.org to obtain the latest version.
To obtain the version of the JUnit extension that is compatible with your version of Spira, you simply need to log-in as a project-level administrator to Spira, go to the Administration home page and download the JUnit Extension compressed archive (.zip). This process is described in the Spira Administration Guide in more detail.
The JUnit extension is provided as a compressed zipfile that includes both the binaries (packaged as a JAR-file) and the source code (stored in a folder structure that mirrors the Java classpath). The JAR-file binary was compiled for use on a Windows x86 platform, other platforms (e.g. Linux) will require you to compile the Java source files into the appropriate Java classfiles before using the extension. The rest of this section will assume that you are using the pre-compiled JAR-file.
Once you have downloaded the Zip archive, you need to uncompress it into a folder of your choice on your local system. Assuming that you uncompressed it to the C:\Program Files\JUnit Extension folder, you should have the following folder structure created:
C:\Program Files\JUnit Extension
C:\Program Files\JUnit Extension\com
C:\Program Files\JUnit Extension\com\inflectra
C:\Program Files\JUnit Extension\com\inflectra\spiratest
C:\Program Files\JUnit Extension\com\inflectra\spiratest\addons
C:\Program Files\JUnit Extension\com\inflectra\spiratest\addons\junitextension
C:\Program Files\JUnit Extension\com\inflectra\spiratest\addons\junitextension\samples
The JAR-file is located in the root folder, the source-code for the extension can be found in the "junitextension" subfolder, and the sample test fixture can be found in the "samples" subfolder.
Now to use the extension within your test cases, you need to first make sure that the JAR-file is added to the Java classpath. The method for doing this is dependent on the platform you're using, so please refer to FAQ on www.junit.org for details on the appropriate method for your platform. As an example, on a Windows platform, the JAR-file would be added to the classpath by typing the following:
set CLASSPATH=%CLASSPATH%; C:\\Program Files\\JUnit Extension\\JUnitExtension.jar
Once you have completed this step, you are now ready to begin using your JUnit test fixtures with Spira.
Using JUnit 5 with Spira
The typical code structure for a JUnit test fixture coded in Java is as follows:
package com.inflectra.spiratest.addons.junitextension.samples;

import org.junit.jupiter.api.BeforeEach;
import org.junit.jupiter.api.Test;
import static org.junit.jupiter.api.Assertions.assertEquals;
import static org.junit.jupiter.api.Assertions.assertTrue;


/**
 * Some simple tests using the ability to return results back to Spira
 *
 * @author Inflectra Corporation
 * @version 4.0.0
 */
public class SimpleTest {
    protected int fValue1;
    protected int fValue2;

    /**
     * Sets up the unit test
     */
    @BeforeEach
    public void setUp() {
        fValue1 = 2;
        fValue2 = 3;
    }

    /**
     * Tests the addition of the two values
     */
    @Test
    public void testAdd() {
        double result = fValue1 + fValue2;

        // forced failure result == 5
        assertTrue(result == 6);
    }

    /**
     * Tests division by zero
     */
    @Test
    public void testDivideByZero() {
        int zero = 0;
        int result = 8 / zero;
    }

    /**
     * Tests two equal values
     */
    @Test
    public void testEquals() {
        assertEquals(12, 12);
        assertEquals(12L, 12L);
        assertEquals(new Long(12), new Long(12));

        assertEquals(12, 13, "Size");
        assertEquals(12.0, 11.99, 0.0, "Capacity");
    }

    /**
     * Tests success
     */
    @Test
    public void testSuccess() {
        //Successful test         assertEquals(12, 12);
    }
}
The Java class is marked as a JUnit test fixture by applying the @BeforeEach attribute to the setup method, and the @Test attribute to each of the test assertion methods individually -- highlighted in yellow above. When you open up the class in a JUnit runner or execute from the command line it loads all the test classes and executes all the methods marked with @Test in turn.
Each of the Assert statements is used to test the state of the application after executing some sample code that calls the functionality being tested. If the condition in the assertion is true, then execution of the test continues, if it is false, then a failure is logged and JUnit moves on to the next test method.
So, to use Spira with JUnit, each of the test cases written for execution by JUnit needs to have a corresponding test case in Spira. These can be either existing test cases that have manual test steps or they can be new test cases designed specifically for automated testing and therefore have no defined test steps. In either case, the changes that need to be made to the JUnit test fixture for Spira to record the JUnit test run are illustrated below:
package com.inflectra.spiratest.addons.junitextension.samples;

import com.inflectra.spiratest.addons.junitextension.*;

import org.junit.jupiter.api.BeforeEach;
import org.junit.jupiter.api.Test;
import static org.junit.jupiter.api.Assertions.assertEquals;
import static org.junit.jupiter.api.Assertions.assertTrue;


/**
 * Some simple tests using the ability to return results back to Spira
 *
 * @author Inflectra Corporation
 * @version 5.0.0
 */
@SpiraTestConfiguration(
        //following are REQUIRED
        url = "https://demo-us.spiraservice.net/mysite",
        login = "fredbloggs",
        rssToken = "{XXXXXXXXXXXXXXXX}", // make sure to use your API/RSS key and not your login password
        projectId = 1,
        //following are OPTIONAL
        releaseId = 7,
        testSetId = 1
)

public class SimpleTest {
    protected int fValue1;
    protected int fValue2;

    /**
     * Sets up the unit test
     */
    @BeforeEach
    public void setUp() {
        fValue1 = 2;
        fValue2 = 3;
    }

    /**
     * Tests the addition of the two values
     */
    @Test
    @SpiraTestCase(testCaseId = 2)
    public void testAdd() {
        double result = fValue1 + fValue2;

        // forced failure result == 5
        assertTrue(result == 6);
    }

    /**
     * Tests division by zero
     */
    @Test
    @SpiraTestCase(testCaseId = 3)
    public void testDivideByZero() {
        int zero = 0;
        int result = 8 / zero;
    }

    /**
     * Tests two equal values
     */
    @Test
    @SpiraTestCase(testCaseId = 4)
    public void testEquals() {
        assertEquals(12, 12);
        assertEquals(12L, 12L);
        assertEquals(new Long(12), new Long(12));

        assertEquals(12, 13, "Size");
        assertEquals(12.0, 11.99, 0.0, "Capacity");
    }

    /**
     * Tests success
     */
    @Test
    @SpiraTestCase(testCaseId = 5)
    public void testSuccess() {
        //Successful test         assertEquals(12, 12);
    }
}
The overall class is marked with a new @SpiraTestConfiguration attribute that contains the following pieces of information needed to access the Spira test repository:
- URL - The URL to the instance of Spira being accessed. This needs to start with http:// or https://.
- Login - A valid username for the instance of Spira.
- RSS Token: Use the API key / RSS key for your user profile NOT your login password. This can be found in your profile page (RSS Feeds must be enabled for this to work).
- Project Id - The ID of the project (this can be found on the project homepage in the "Project Overview" section)
- Release Id (Optional) - The ID of the release to associate the test run with. This can be found on the releases list page (click on the Planning > Releases tab). If you don't want to specify a release, just use the value -1.
- Test Set Id (Optional) -- The ID of the test set to associate the test run with. This can be found on the test set list page (click on the Testing > Test Sets tab). If you don't want to specify a test set, just use the value -1. If you choose a test set that is associated with a release, then you don't need to explicitly set a release id (i.e. just use -1). However if you do set a release value, it will override the value associated with the test set.
In addition, each of the individual test methods needs to be mapped to a specific test case within Spira. This is done by adding a @SpiraTestCase attribute to the test method together with the ID of the corresponding test case in Spira. The Test Case ID can be found on the test cases list page (click the "Test Cases" tab).
-- The test methods must be marked as public or the test results will not appear in Spira --
For these attributes to be available in your test fixture, you also need to add a reference to the com.inflectra.spiratest.addons.junitextension package. This package is bundled within the supplied JAR-file library for Windows, and can be compiled from the provided source .java files on other platforms.
Now all you need to do is compile your code and then launch JUnit by executing the test fixture through the command line, or through your choice of IDE, e.g. Eclipse, IntelliJ). We shall show one example of each:
a) Executing JUnit 5 Tests using Command Line
To execute JUnit 5 tests using the command line, you need to download the junit-platform-console-standalone.jar JUnit 5 package from Maven and use that to run the tests.
For our sample test, you would use the following command to launch the JUnit tests:
java -jar "C:\AutomatedTesting\JUnitExtension\junit-platform-console-standalone-1.8.0-M1.jar"--classpath="C:\AutomatedTesting\JUnitExtension\JUnit 5\bin" -classpath="C:\AutomatedTesting\JUnitExtension\Jars\JUnit_5_Extension_jar\JUnit 5 Extension.jar" --select-class=com.inflectra.spiratest.addons.junitextension.samples.SimpleTest

This includes both the Spira extension JAR and the sample tests being executed on the classpath and the class name of the sample tests in the select argument.
When executed it will report back to the command line:
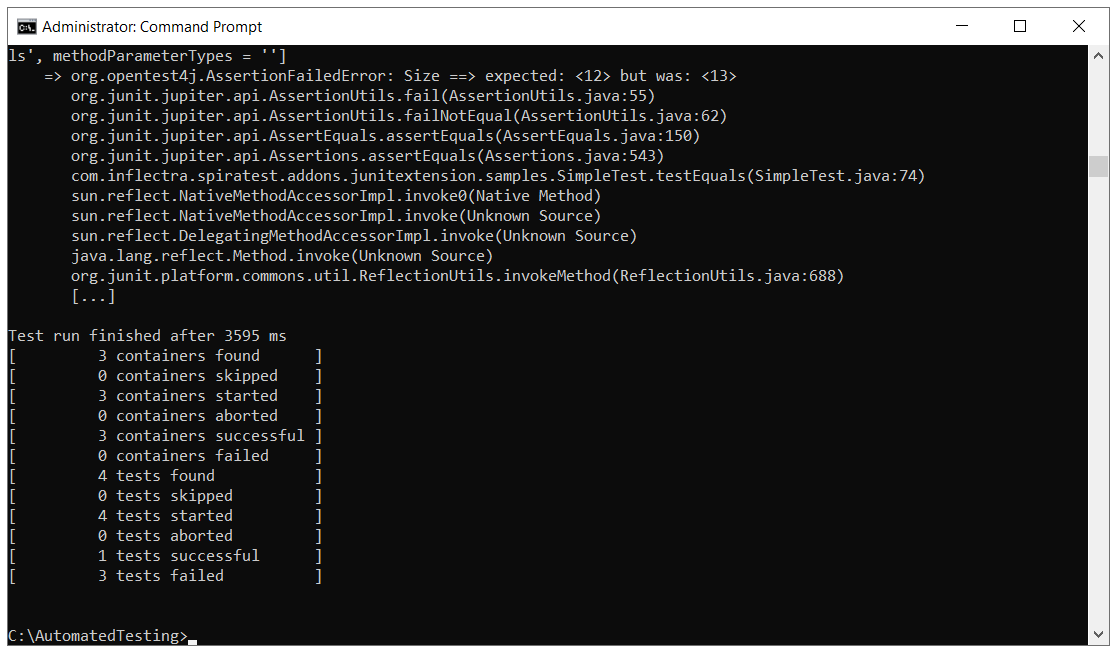
and the results will also appear in Spira.
b) Executing JUnit 5 Tests using Eclipse
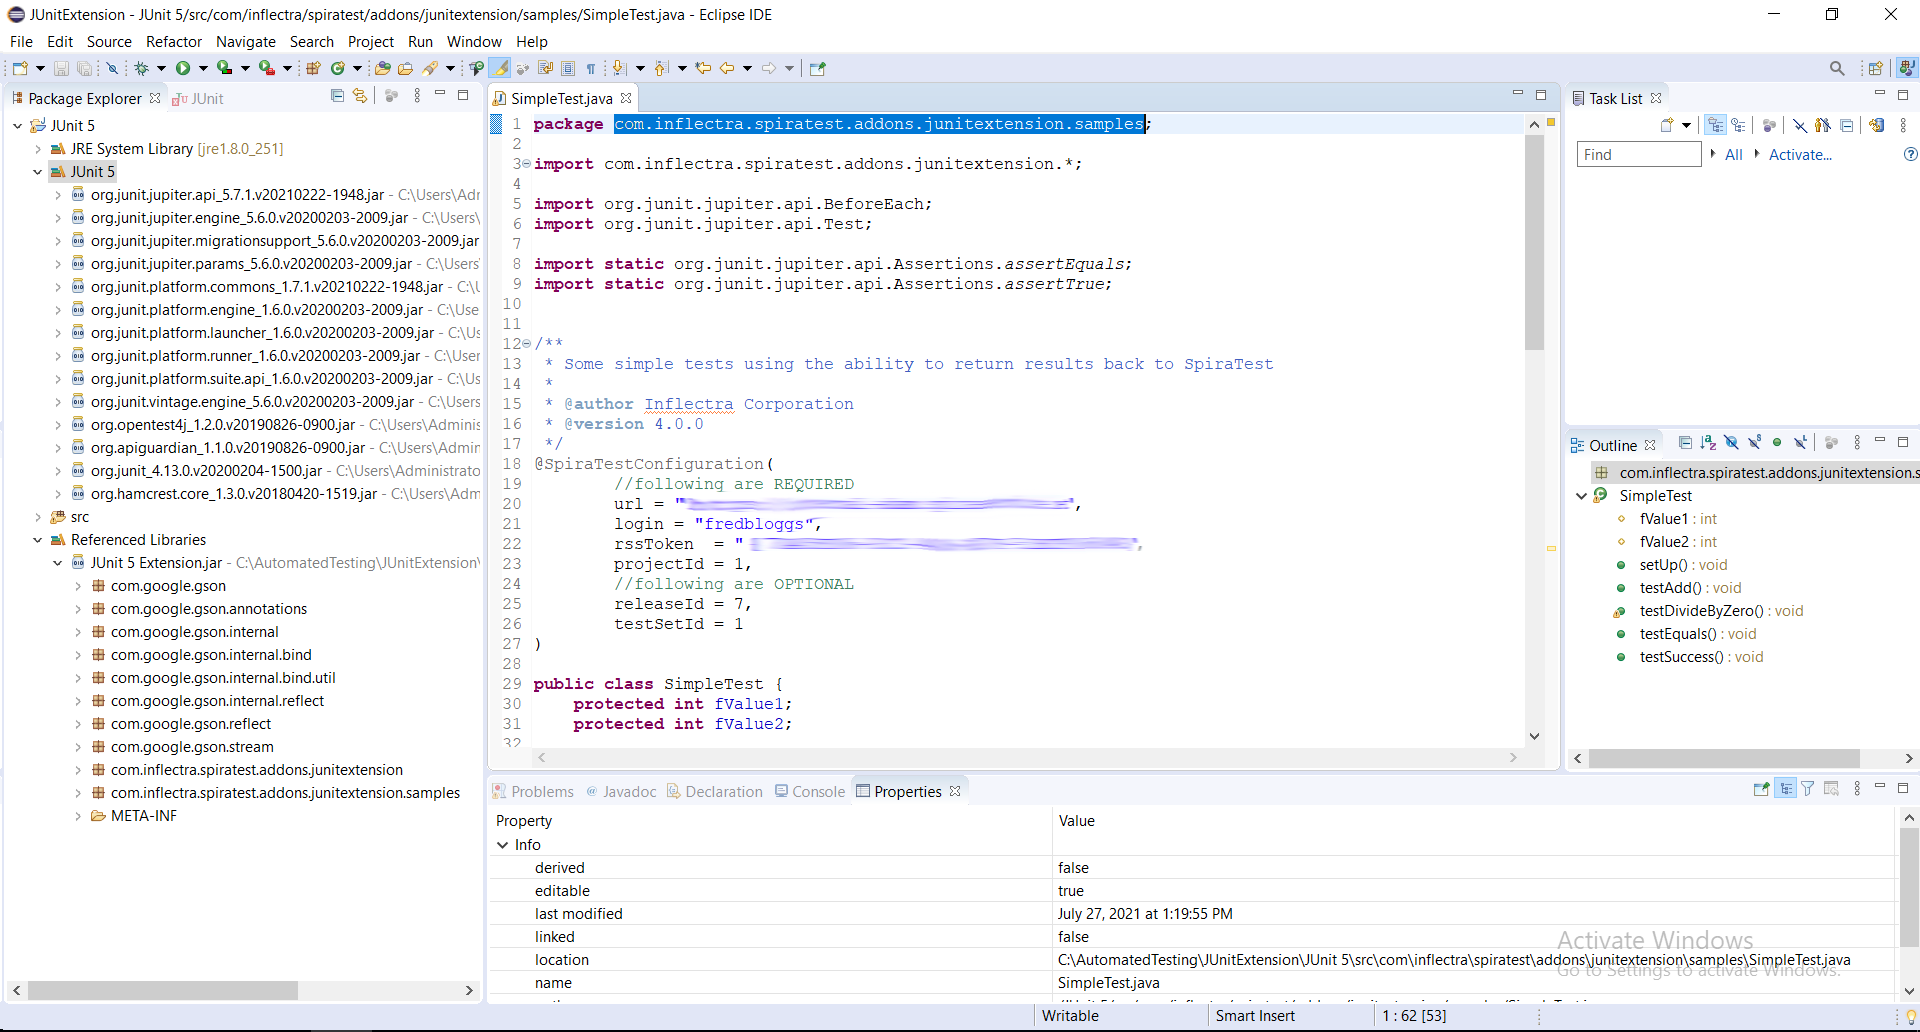
To execute the tests in Eclipse, simply open your automated test script in an Eclipse project, ensure you have the JUnit Eclipse plugin installed, and finally make sure you add a reference to the Spira JUnit 5 Extension.jar JAR file:
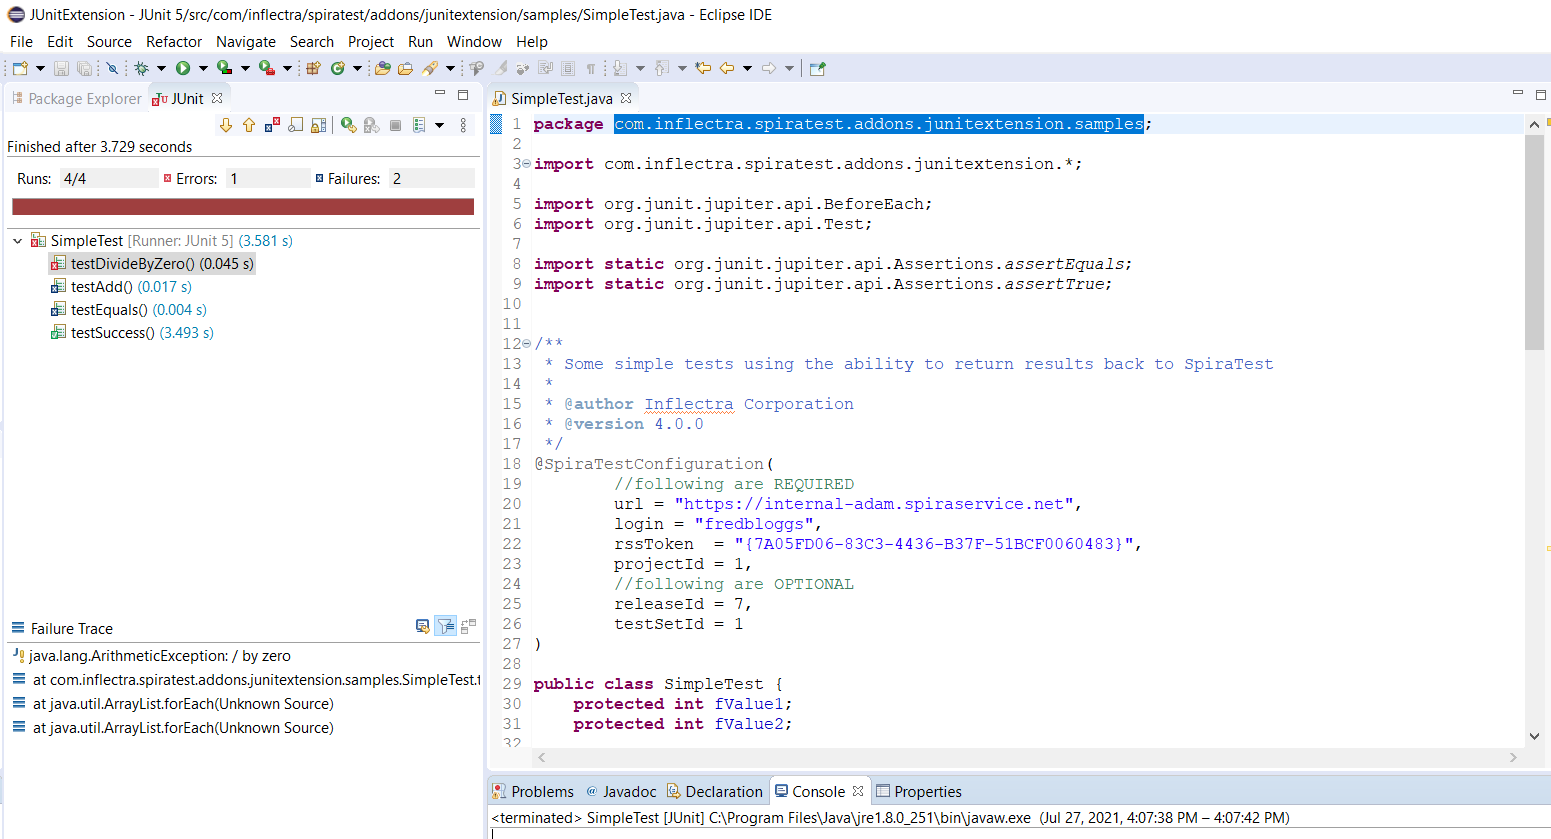
Then when you choose the option to Run As a JUnit 5 it will execute the tests:
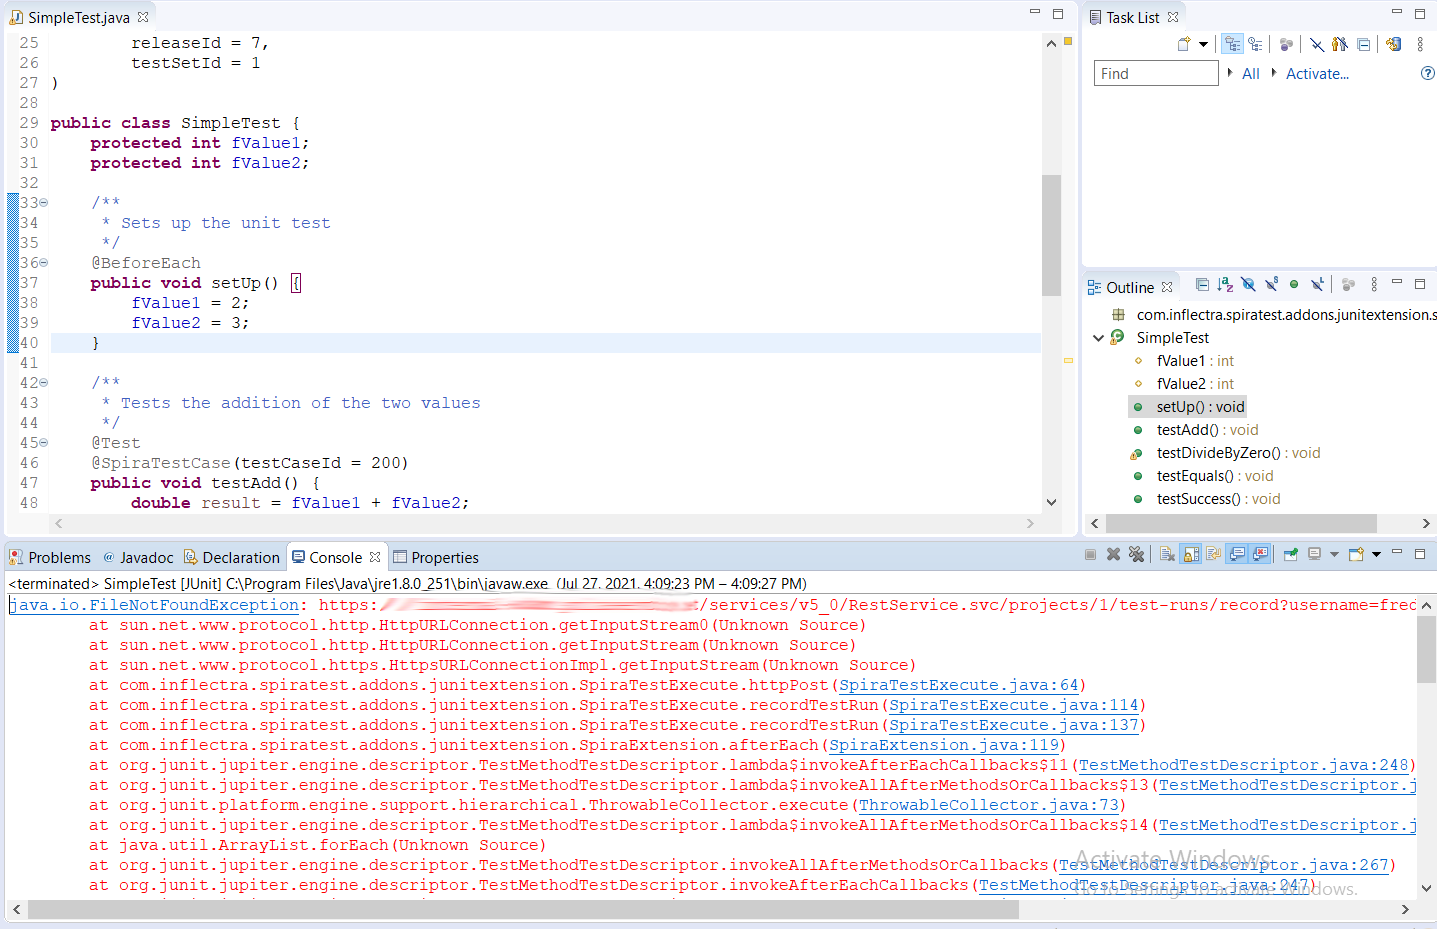
If for any reason you don't see the test results appear in Spira, make sure you have the correct test IDs mapped. If you still don't see the results, check the Console tab inside Eclipse for any errors connecting to Spira:
Viewing the Test Results in Spira
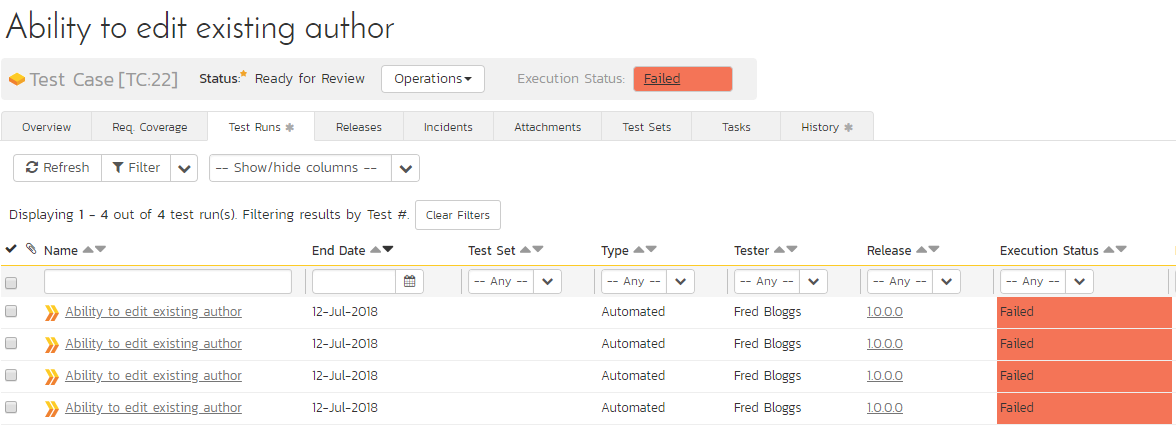
Once the test has run using one of the previous methods, you can view the test cases in Spira, you should see a JUnit automated test run displayed in the list of executed test runs:
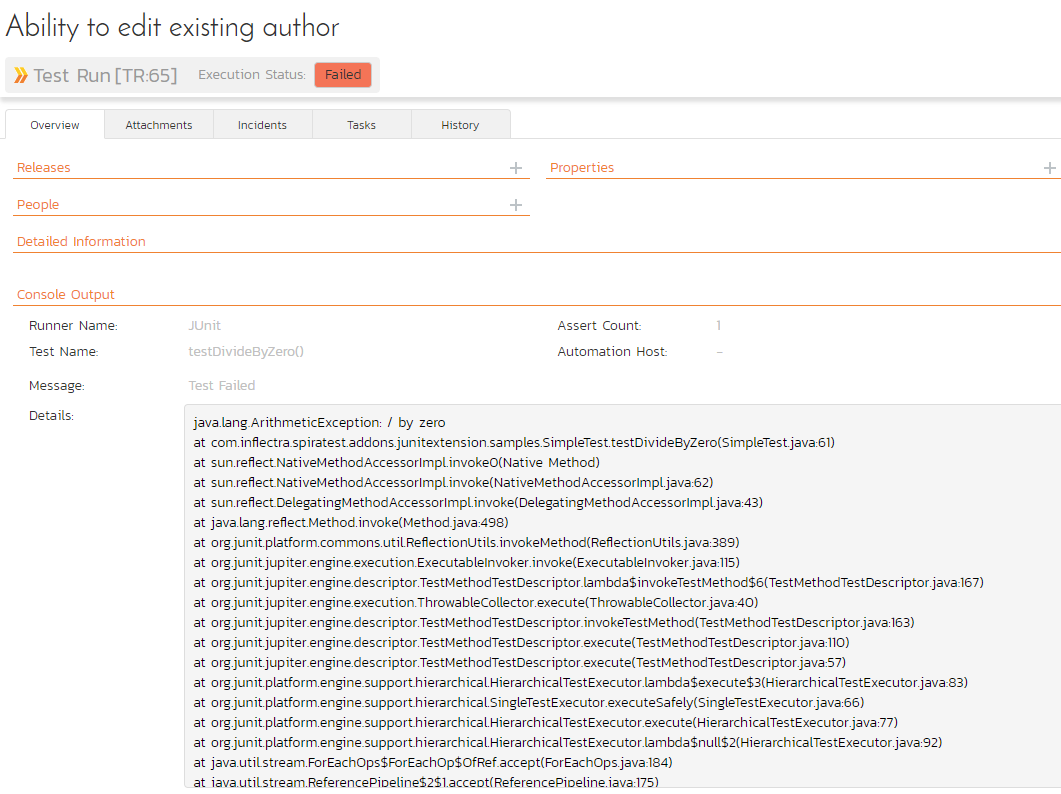
Clicking on one of the JUnit test runs will bring up a screen that provides information regarding what JUnit test method failed, what the error was, together with the associated code stack-trace:
Congratulations... You are now able to run JUnit 5 automated tests and have the results be recorded within Spira. The sample test fixture SimpleText.java is provided with the installation.
Installing the JUnit 4 Extension
This section outlines how to install the Spira Extension for JUnit onto a workstation so that you can then run automated JUnit tests against a Java application and have the results be recorded as test runs inside Spira. It assumes that you already have a working installation of Spira v3.0 or later. If you have an earlier version of Spira you will need to upgrade to at least v3.0 before trying to use this extension. You will also need to have version 4.0 of JUnit. To use version 5.0 of JUnit, please visit Installing the JUnit 5 Extension
To obtain the version of the JUnit extension that is compatible with your version of Spira, you simply need to log-in as a project-level administrator to Spira, go to the Administration home page and download the JUnit Extension compressed archive (.zip). This process is described in the Spira Administration Guide in more detail.
The JUnit extension is provided as a compressed zipfile that includes both the binaries (packaged as a JAR-file) and the source code (stored in a folder structure that mirrors the Java classpath). The JAR-file binary was compiled for use on a Windows x86 platform, other platforms (e.g. Linux) will require you to compile the Java source files into the appropriate Java classfiles before using the extension. The rest of this section will assume that you are using the pre-compiled JAR-file.
Once you have downloaded the Zip archive, you need to uncompress it into a folder of your choice on your local system. Assuming that you uncompressed it to the C:\Program Files\JUnit Extension folder, you should have the following folder structure created:
C:\Program Files\JUnit Extension
C:\Program Files\JUnit Extension\com
C:\Program Files\JUnit Extension\com\inflectra
C:\Program Files\JUnit Extension\com\inflectra\spiratest
C:\Program Files\JUnit Extension\com\inflectra\spiratest\addons
C:\Program Files\JUnit Extension\com\inflectra\spiratest\addons\junitextension
C:\Program Files\JUnit Extension\com\inflectra\spiratest\addons\junitextension\samples
The JAR-file is located in the root folder, the source-code for the extension can be found in the "junitextension" subfolder, and the sample test fixture can be found in the "samples" subfolder.
Now to use the extension within your test cases, you need to first make sure that the JAR-file is added to the Java classpath. The method for doing this is dependent on the platform you're using, so please refer to FAQ on www.junit.org for details on the appropriate method for your platform. As an example, on a Windows platform, the JAR-file would be added to the classpath by typing the following: set CLASSPATH=%CLASSPATH%; C:\\Program Files\\JUnit Extension\\JUnitExtension.jar
Once you have completed this step, you are now ready to begin using your JUnit test fixtures with Spira.
Using JUnit 4 with Spira
The typical code structure for a JUnit test fixture coded in Java is as follows:
package com.inflectra.spiratest.addons.junitextension.samples;

import static org.junit.Assert.*;
import junit.framework.JUnit4TestAdapter;
import org.junit.Before;
import org.junit.Test;
import org.junit.runner.*;
import org.junit.runner.notification.*;

import java.util.*;

/**
 * Some simple tests using JUnit 4
 *
 * @author      Inflectra Corporation
 * @version     2.3.0
 *
 */
public class SimpleTest
{
    protected int fValue1;
    protected int fValue2;

    /**
     * Sets up the unit test
     */
    @Before
    public void setUp()
    {
        fValue1= 2;
        fValue2= 3;
    }

    /**
     * Tests the addition of the two values
     */
    @Test
    public void testAdd()
    {
        double result = fValue1 + fValue2;

        // forced failure result == 5
        assertTrue (result == 6);
    }

    /**
     * Tests division by zero
     */
    @Test
    public void testDivideByZero()
    {
        int zero = 0;
        int result = 8 / zero;
        result++; // avoid warning for not using result
    }

    /**
     * Tests two equal values
     */
    @Test

    public void testEquals()
    {
        assertEquals(12, 12);
        assertEquals(12L, 12L);
        assertEquals(new Long(12), new Long(12));

        assertEquals("Size", 12, 13);
        assertEquals("Capacity", 12.0, 11.99, 0.0);
    }

    /**
     * Tests success
     */
    @Test
    public void testSuccess()
    {
        //Successful test
        assertEquals(12, 12);
    }

    /**
     * Entry point for command line execution
     *
     * @param args  The command line arguments
     */
    public static void main (String[] args)
    {
        //Instantiate the JUnit core
        JUnitCore core = new JUnitCore();

        //Finally run the test fixture
        core.run (SimpleTest.class);
    }

    /**
     * Entry point for JUnit 4.x runners
     *
     * @return      Handle to the test framework
     */
    public static junit.framework.Test suite()
    {
        return new JUnit4TestAdapter(SimpleTest.class);
    }
}
The Java class is marked as a JUnit test fixture by applying the @Before attribute to the setup method, and the @Test attribute to each of the test assertion methods individually -- highlighted in yellow above. When you open up the class in a JUnit runner or execute from the command line it loads all the test classes and executes all the methods marked with @Test in turn.
Each of the Assert statements is used to test the state of the application after executing some sample code that calls the functionality being tested. If the condition in the assertion is true, then execution of the test continues, if it is false, then a failure is logged and JUnit moves on to the next test method.
So, to use Spira with JUnit, each of the test cases written for execution by JUnit needs to have a corresponding test case in Spira. These can be either existing test cases that have manual test steps or they can be new test cases designed specifically for automated testing and therefore have no defined test steps. In either case, the changes that need to be made to the JUnit test fixture for Spira to record the JUnit test run are illustrated below:
package com.inflectra.spiratest.addons.junitextension.samples;

import static org.junit.Assert.*;
import junit.framework.JUnit4TestAdapter;
import org.junit.Before;
import org.junit.Test;
import org.junit.runner.*;
import org.junit.runner.notification.*;

import com.inflectra.spiratest.addons.junitextension.*;

import java.util.*;

/**
 * Some simple tests using the ability to return results back to Spira
 *
 * @author      Inflectra Corporation
 * @version     2.3.0
 *
 */
@SpiraTestConfiguration(
    url="http://sandman/SpiraTest",
    login="fredbloggs",
    password="fredbloggs",
    projectId=1,
    releaseId=1,
    testSetId=1
)
public class SimpleTest
{
    protected int fValue1;
    protected int fValue2;

    /**
     * Sets up the unit test
     */
    @Before
    public void setUp()
    {
        fValue1= 2;
        fValue2= 3;
    }

    /**
     * Tests the addition of the two values
     */
    @Test
    @SpiraTestCase(testCaseId=5)
    public void testAdd()
    {
        double result = fValue1 + fValue2;

        // forced failure result == 5
        assertTrue (result == 6);
    }

    /**
     * Tests division by zero
     */
    @Test
    @SpiraTestCase(testCaseId=5)
    public void testDivideByZero()
    {
        int zero = 0;
        int result = 8 / zero;
        result++; // avoid warning for not using result
    }

    /**
     * Tests two equal values
     */
    @Test
    @SpiraTestCase(testCaseId=6)
    public void testEquals()
    {
        assertEquals(12, 12);
        assertEquals(12L, 12L);
        assertEquals(new Long(12), new Long(12));

        assertEquals("Size", 12, 13);
        assertEquals("Capacity", 12.0, 11.99, 0.0);
    }

    /**
     * Tests success
     */
    @Test
    @SpiraTestCase(testCaseId=6)
    public void testSuccess()
    {
        //Successful test
        assertEquals(12, 12);
    }

    /**
     * Entry point for command line execution
     *
     * @param args  The command line arguments
     */
    public static void main (String[] args)
    {
        //Instantiate the JUnit core
        JUnitCore core = new JUnitCore();

        //Add the custom SpiraTest listener
        core.addListener(new SpiraTestListener());

        //Finally run the test fixture
        core.run (SimpleTest.class);
    }

    /**
     * Entry point for JUnit 4.x runners
     *
     * @return      Handle to the test framework
     */
    public static junit.framework.Test suite()
    {
        return new JUnit4TestAdapter(SimpleTest.class);
    }
}
The overall class is marked with a new @SpiraTestConfiguration attribute that contains the following pieces of information needed to access the Spira test repository:
- URL - The URL to the instance of Spira being accessed. This needs to start with http:// or https://.
- Login - A valid username for the instance of Spira.
- Password - A valid password for the instance of Spira.
- Project Id - The ID of the project (this can be found on the project homepage in the "Project Overview" section)
- Release Id (Optional) - The ID of the release to associate the test run with. This can be found on the releases list page (click on the Planning > Releases tab). If you don't want to specify a release, just use the value -1.
- Test Set Id (Optional) -- The ID of the test set to associate the test run with. This can be found on the test set list page (click on the Testing > Test Sets tab). If you don't want to specify a test set, just use the value -1. If you choose a test set that is associated with a release, then you don't need to explicitly set a release id (i.e. just use -1). However if you do set a release value, it will override the value associated with the test set.
In addition, each of the individual test methods needs to be mapped to a specific test case within Spira. This is done by adding a @SpiraTestCase attribute to the test method together with the ID of the corresponding test case in Spira. The Test Case ID can be found on the test cases list page (click the "Test Cases" tab).
For these attributes to be available in your test fixture, you also need to add a reference to the com.inflectra.spiratest.addons.junitextension package. This package is bundled within the supplied JAR-file library for Windows, and can be compiled from the provided source .java files on other platforms.
Now all you need to do is compile your code and then launch JUnit by executing the test fixture through the command line (or through your choice of IDE, e.g. Eclipse). E.g. for our sample test, you would use the following command:
java com.inflectra.spiratest.addons.junitextension.samples.SimpleTest
Once the test has run, you can view the test cases in Spira, you should see a JUnit automated test run displayed in the list of executed test runs:
Clicking on one of the JUnit test runs will bring up a screen that provides information regarding what JUnit test method failed, what the error was, together with the associated code stack-trace:
Congratulations... You are now able to run JUnit automated tests and have the results be recorded within Spira. The sample test fixture SimpleText.java is provided with the installation.
Have Questions or Need Assistance?
If you are an Inflectra customer, please contact our customer support at: - Email: support@inflectra.com - Help Desk: https://www.inflectra.com/Support/
Otherwise, please feel free to post a question on our public forums: