Selenium
Selenium Remote Control (RC) is a test tool that allows you to write automated web application user interface tests in any programming language against any HTTP website using any mainstream JavaScript-enabled browser. Selenium RC comes in two parts.
-
A server which can automatically launch and kill supported browsers, and acts as a HTTP proxy for web requests from those browsers.
-
Client applications that send commands to the Selenium-RC server in a special language (called Selenese) that tell it what operations to perform on the launched web browser.
This section describes how you can use SpiraTest / SpiraTeam (hereafter SpiraTeam) together with RemoteLaunch to schedule and remotely launch instances of Selenium-RC (hereafter just referred to as Selenium) on different computers and have the testing results be transmitted back to SpiraTeam. This allows you to extend your SpiraTeam's test management capabilities to include automated Selenium web tests.
Note: This integration requires at least version 3.0 of SpiraTest/Team and version 1.0 of Selenium-Remote Control.
Installing the Selenium Engine
This section assumes that you already have a working installation of SpiraTest or SpiraTeam and have installed RemoteLaunch on the various test automation hosts following the instructions in RemoteLaunch Guide. Once those prerequisites are in place, please follow these steps:
- Download and extract the SeleniumAutomationEngine.zip file
from the Inflectra website and locate the appropriate SeleniumX.dll for
the version of Selenium that you are using.
- If you don't see the version listed, just use the nearest version that is lower than your current version.
- Copy the file "SeleniumX.dll" (where X is the appropriate version) into the "extensions" sub-folder of the RemoteLaunch installation.
- Also copy the ThoughtWorks.Selenium.Core.dll from the zipfile into the "extensions" sub-folder.
- Log in to SpiraTeam as a system administrator and go into SpiraTeam main Administration page and click on the "Test Automation" link under Integration.
-
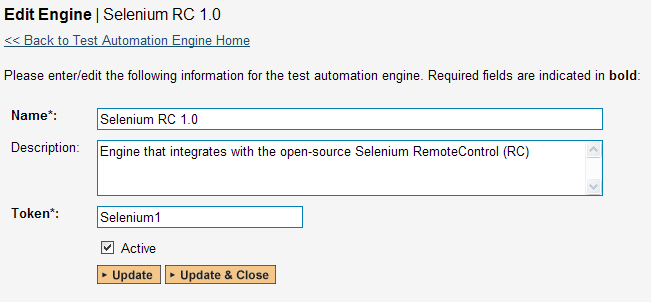
Click the "Add" button to enter the new test automation engine details page. The fields required are as follows:
-
Name: This is the short display name of the automation engine. It can be anything that is meaningful to your users.
-
Description: This is the long description of the automation engine. It can be anything that is meaningful to your users. (Optional)
-
Active: If checked, the engine is active and able to be used for any project.
-
Token: This needs to be the assigned unique token for the automation engine and is used to tell RemoteLaunch which engine to actually use for a given test case. For Selenium this should be SeleniumX where 'X' is the version number of the DLL file that you are using.
-
Once you have finished, click the "Insert & Close" button and you will be taken back to the Test Automation list page, with Selenium listed as an available automation engine.
Advanced Settings
You can modify the Selenium configuration for each of the specific automation hosts, by right-clicking on the RemoteLaunch icon in the system tray and choosing "Configuration". That will bring up the RemoteLaunch configuration page.
a) Selenium-RC 1.0
The Selenium 1.0 engine adds its own tab to this page which allows you to configure how Selenium operates:
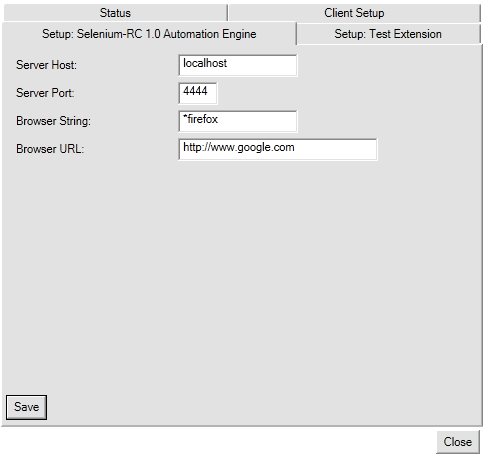
The following fields can be specified on this screen:
-
Server Host -- This should be the name / IP address of the Selenium server. Typically this will be localhost because RemoteLaunch is usually installed on the Selenium server itself.
-
Server Port -- This should be set to the custom port that the Selenium server uses as a proxy when intercepting requests to the browser. The default value is 4444.
-
Browser String -- This needs to be the name of the browser that the Selenium server will launch. Common values include:
-
*firefox -- This will launch the Firefox web browser
-
*iexplore -- This will launch the Microsoft Internet Explorer web browser
-
*safari -- This will launch the Apple Safari web browser
-
-
Browser URL -- This needs to be the initial URL that you want the browser to open to
a) Selenium WebDriver 2.x
The Selenium 2.x engine adds its own tab to this page which allows you to configure how Selenium operates:
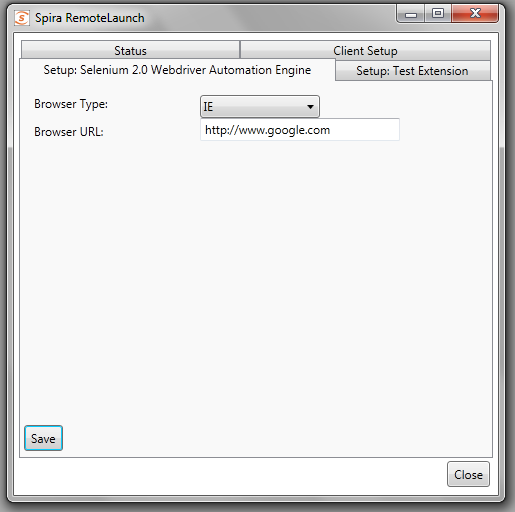
The following fields can be specified on this screen:
Browser Type -- This needs to be set to the type of browser that the Selenium webdriver will launch.
Browser URL -- This needs to be the initial URL that you want the browser to open to
Setting up the Automated Test Cases
This section describes the process for setting up a test case in SpiraTeam for automation and either linking it to an existing Selenium test script file or entering a Selenium test script directly into SpiraTeam.
Attaching a Selenium Test Script
First you need to display the list of test cases in SpiraTeam (by clicking Testing > Test Cases) and then add a new test case. Once you have added the new test case, click on it and select the "Automation" tab:

You need to enter the following fields:
-
Automation Engine - Choose the Selenium Automation Engine that you created in the previous section from the drop-down list.
-
Script Type -- This should be set to Attached for this case
-
Filename -- Since the test script is going to be entered directly into SpiraTeam you can enter any name you like for the filename as long as it's logical and memorable.
-
Document Type -- you can choose which document type the automated test script will be categorized under.
-
Document Folder -- you can choose which document folder the automated test script will be stored in.
-
Version -- The version of the test script (1.0 is used if no value specified)
-
Test Script -- This needs to contain the complete Selenium test script written in Selenium IDE Selenese. Selenium IDE test scripts consist of three parts:
-
The command
-
The target of the command
-
The data to be used
-
-
You should enter the three components on each line separated by the Pipe (|) character. If you need to use a pipe character inside any of the components you can escape it with a backslash (\|).
-
An example command would be type|q|hello
-
If the command doesn't need all three components, you can simply leave it out (for example open||http://www.inflectra.com)
-
-
If you would like to have SpiraTeam pass any parameter values to this test script (this will be discussed in more detail later) you can specify them by using the syntax ${parameterName}.
- An example parameterized command would be open||${url}
A complete sample script is illustrated below:
open||http://www.google.com/webhp
assertTitle||Google
type|q|${query}
click|btnG
waitForPageToLoad||5000
isTextPresent||${matchtext}
Once you are happy with the values, click [Save] to update the test case. Now you are ready to schedule the automated test case for execution.
Linking a Selenium Test Script
First you need to display the list of test cases in SpiraTeam (by clicking Testing > Test Cases) and then add a new test case. Once you have added the new test case, click on it and select the "Automation" tab:
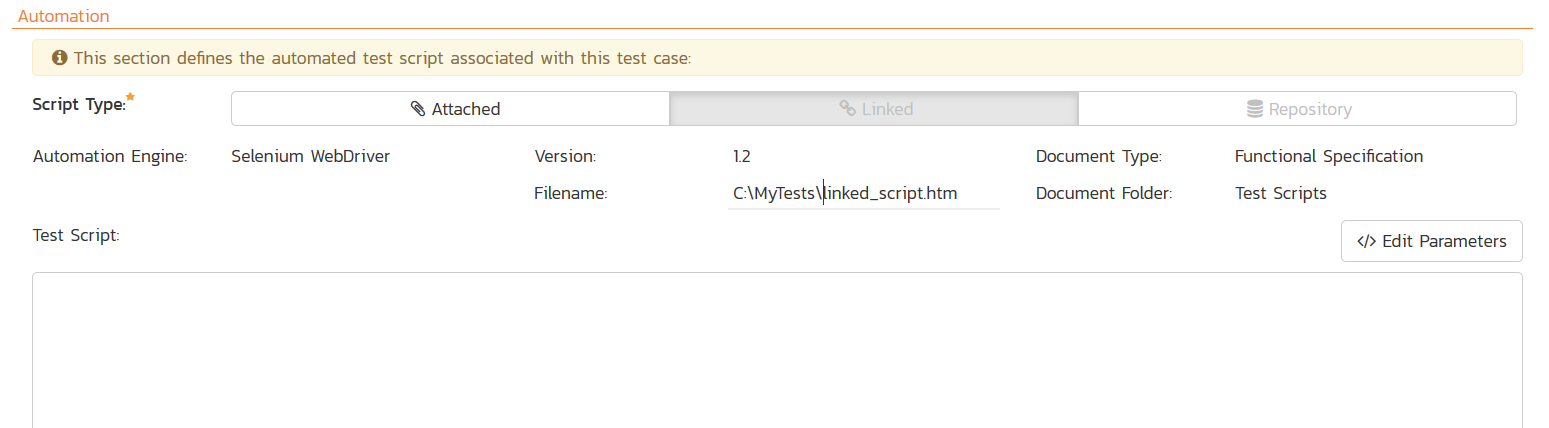
You need to enter the following fields:
-
Automation Engine - Choose the Selenium Automation Engine that you created in the previous section from the drop-down list.
-
Script Type -- This should be set to Linked for this case
-
Filename -- This needs to be the full path to the Selenium IDE test script file. To make this easier across different machines, you can use several constants for standard Windows locations:
-
[MyDocuments] -- The user's "My Documents" folder. The user indicated is the user that ran RemoteLaunch.
-
[CommonDocuments] -- The Public Document's folder.
-
[DesktopDirectory] -- The user's Desktop folder. The user indicated is the user that ran RemoteLaunch.
-
[ProgramFiles] -- Translated to the Program Files directory. For 64-bit machines, it's the 64-bit directory.
-
[ProgramFilesX86] -- Translated to the 32-bit Program Files directory.
-
-
Document Type -- If using SpiraTeam (not SpiraTest) you can choose which document type the automated test script will be categorized under.
-
Document Folder -- If using SpiraTeam (not SpiraTest) you can choose which document folder the automated test script will be stored in.
-
Version -- The version of the test script (1.0 is used if no value specified)
-
Test Script -- This is not used when you are using the linked test script option
The linked test script needs to be an HTML document that contains a table with three columns. Each row corresponds to a single Selenium action. Each of the columns in the row corresponds to the three Selenium command components:
-
The command
-
The target of the command
-
The data to be used
An example Selenium test script is illustrated below:
<html>
<body>
<table>
<tr>
<td>
open
</td>
<td>
</td>
<td>
http://www.google.com/webhp
</td>
</tr>
<tr>
<td>
assertTitle</td>
<td>
</td>
<td>
Google</td>
</tr>
<tr>
<td>
type</td>
<td>
q</td>
<td>
${query}</td>
</tr>
<tr>
<td>
click</td>
<td>
btnG</td>
<td>
</td>
</tr>
<tr>
<td>
waitForPageToLoad</td>
<td>
</td>
<td>
5000</td>
</tr>
<tr>
<td>
isTextPresent</td>
<td>
</td>
<td>
${matchtext}</td>
</tr>
</table>
</body>
</html>
When opened in an HTML editing tool it looks like:
| open | http://www.google.com/webhp | |
| assertTitle | ||
| type | q | ${query} |
| click | btnG | |
| waitForPageToLoad | 5000 | |
| isTextPresent | ${matchtext} |
If you would like to have SpiraTeam pass any parameter values to this test script (this will be discussed in more detail later) you can specify them by using the syntax ${parameterName}.
An example parameterized command is displayed in the third and sixth rows of the table above (${query} and ${matchtext}).
Once you are happy with the values, click [Save] to update the test case. Now you are ready to schedule the automated test case for execution.
Using Parameterized Test Cases
There is an advanced feature of SpiraTest/Team and RemoteLaunch that lets you pass parameters from SpiraTeam to your Selenium automated test script. This is very useful if you want to have a data-driven Selenium test script that be executed multiple times with different parameter values.
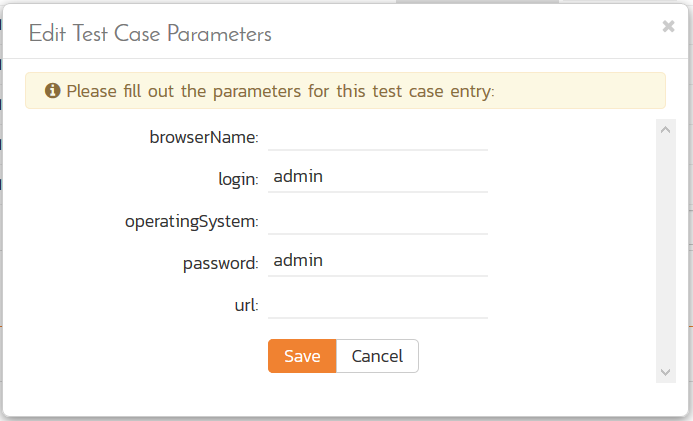
To setup the automated test case for parameters, click on the "Test Steps" tab and click on "Edit Parameters":
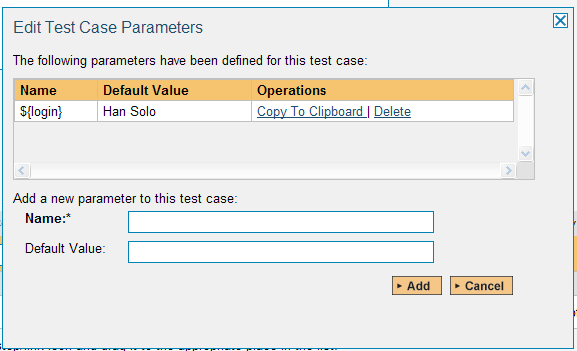
The name of the parameter ${login} needs to match the name of the input parameter defined within the Selenium script.
Executing the Selenium Test Sets from SpiraTeam
There are two ways to execute automated test cases in SpiraTeam:
-
Schedule the test cases to be executed on a specific computer (local or remote) at a date/time in the future
-
Execute the test cases right now on the local computer.
We shall outline both of these two scenarios in this section. However first we need to setup the appropriate automation hosts and test sets in SpiraTeam:
Configuring the Automation Hosts and Test Sets
Go to Testing > Automation Hosts in SpiraTeam to display the list of automation hosts:
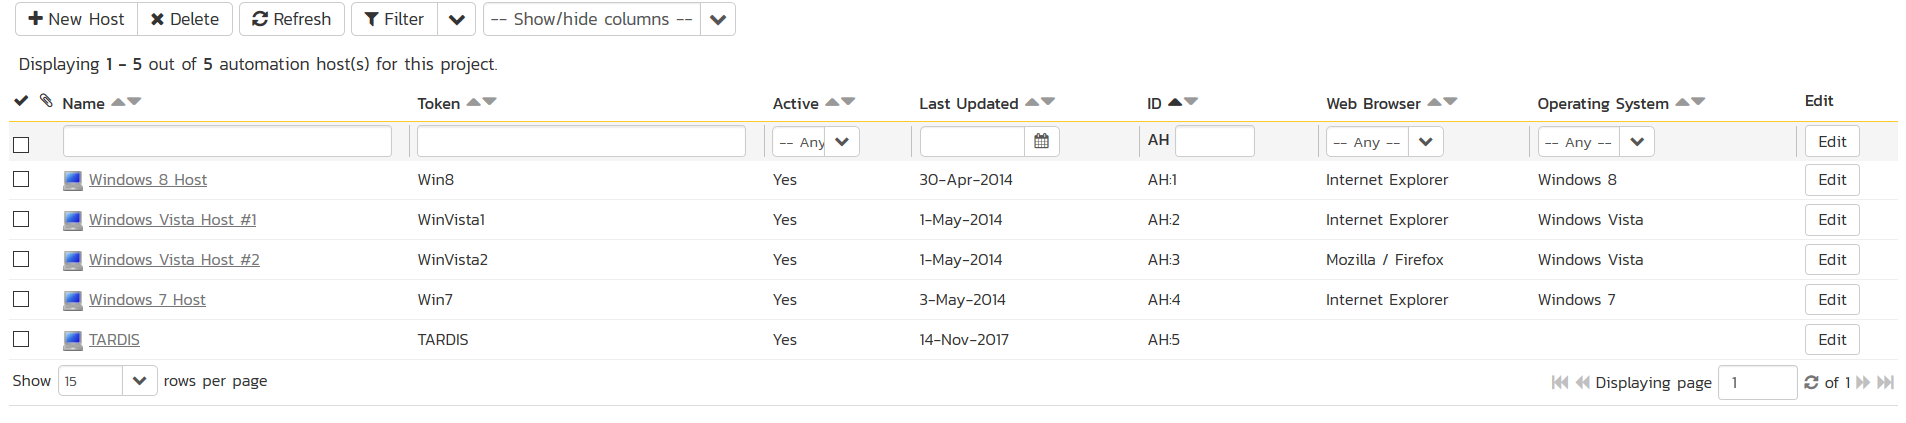
Make sure that you have created an Automation Host for each computer that is going to run an automated test case. The name and description can be set to anything meaningful, but the Token field must be set to the same token that is specified in the RemoteLaunch application on that specific machine.
Once you have at least one Automation Host configured, go to Testing > Test Sets to create the test sets that will contain the automated test case:

Note: Unlike manual test cases, automated test cases must be executed within a test set -- they cannot be executed directly from the test case.
Create a new Test Set to hold the Selenium automated test cases and click on its hyperlink to display the test set details page:
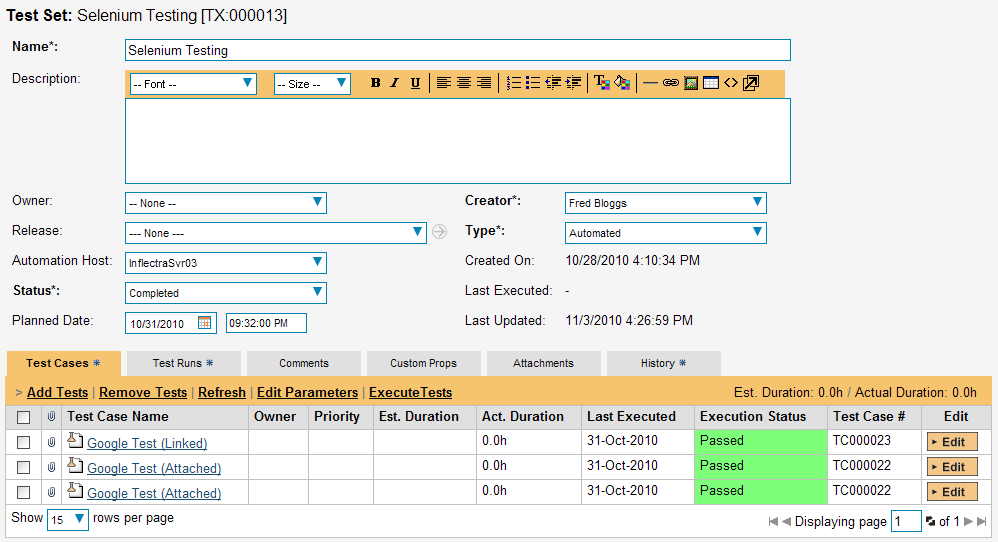
You need to add at least one automated test case to the test set and then configure the following fields:
-
Automation Host -- This needs to be set to the name of the automation host that will be running the automated test set.
-
Planned Date -- The date and time that you want the scenario to begin. (Note that multiple test sets scheduled at the exact same time will be scheduled by Test Set ID order.)
-
Status -- This needs to be set to "Not Started" for RemoteLaunch to pick up the scheduled test set. When you change the Planned Date, the status automatically switches back to "Not Started"
-
Type -- This needs to be set to "Automated" for automated testing
If you have parameterized test cases inside the automated test set you can set their values in three different ways:
-
Test Set Parameter Values -- this lets you set the same value of a parameter for all the test cases in the test set:

-
Test Case Parameter Values -- this lets you set a specific value for a parameter for a particular test case in the test set:
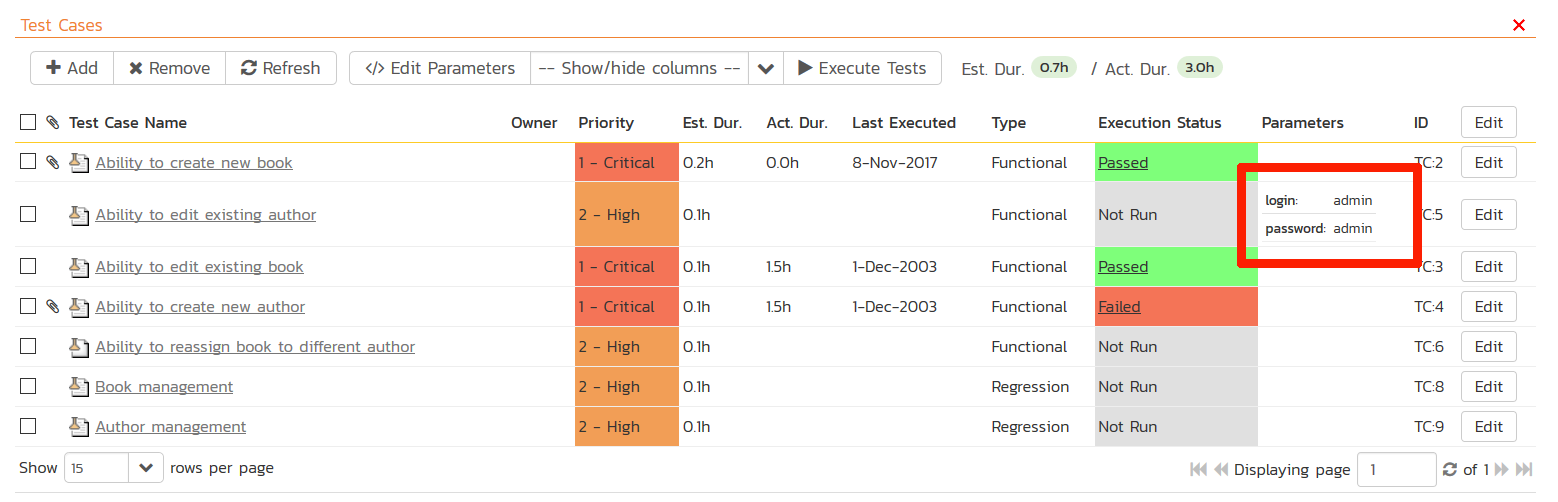
You set these values, by right-clicking on a row and choosing "Edit
Parameters":
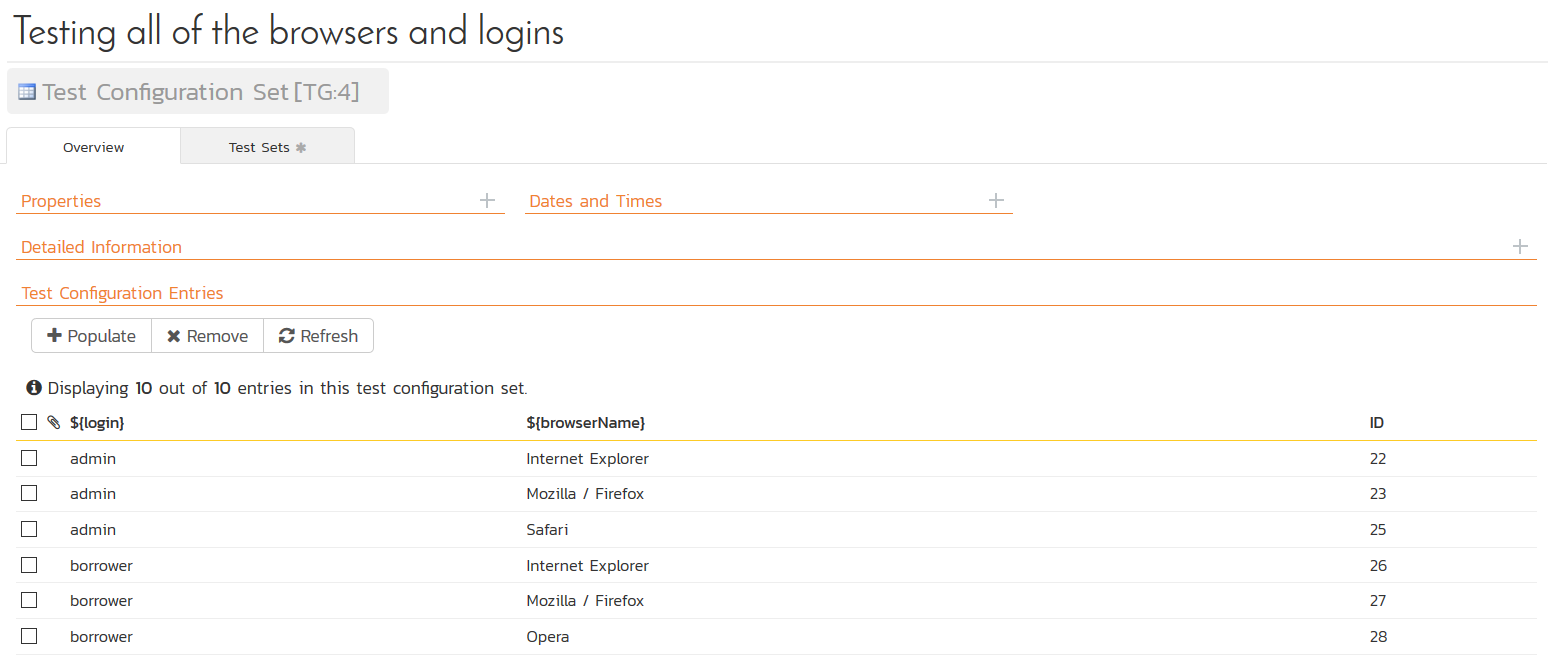
- Test Configurations -- this lets you create a data grid of
possible test parameters and execute the test set multiple times,
once for each unique combination:
Executing the Test Sets
Once you have set the various test set fields (as described above), the Remote Launch instances will periodically poll SpiraTeam for new test sets. Once they retrieve the new test set, they will add it to their list of test sets to execute. Once execution begins they will change the status of the test set to "In Progress", and once test execution is done, the status of the test set will change to either "Completed" -- the automation engine could be launched and the test has completed -- or "Blocked" -- RemoteLaunch was not able to start the automation engine.
If you want to immediately execute the test case on your local computer, instead of setting the "Automation Host", "Status" and "Planned Date" fields, you can instead click the [Execute] icon on the test set itself. This will cause RemoteLaunch on the local computer to immediately start executing the current test set.
In either case, once all the test cases in the test set have been completed, the status of the test set will switch to "Completed" and the individual test cases in the set will display a status based on the results of the Selenium test:
Passed -- The Selenium automated test ran successfully and all the test conditions in the test script passed
Failed -- The Selenium automated test ran successfully, but at least one test condition in the test script failed.
Blocked -- The Selenium automated test did not run successfully
If you receive the "Blocked" status for either the test set or the test cases you should open up the Windows Application Event Log on the computer running RemoteLaunch and look in the event log for error messages.
Note: While the tests are executing you may see browser windows launch as the Selenium server executes the appropriate tests.
Once the tests have completed, you can log back into SpiraTeam and see the execution status of your test cases. If you click on a Test Run that was generated by Selenium, you will see the following information:
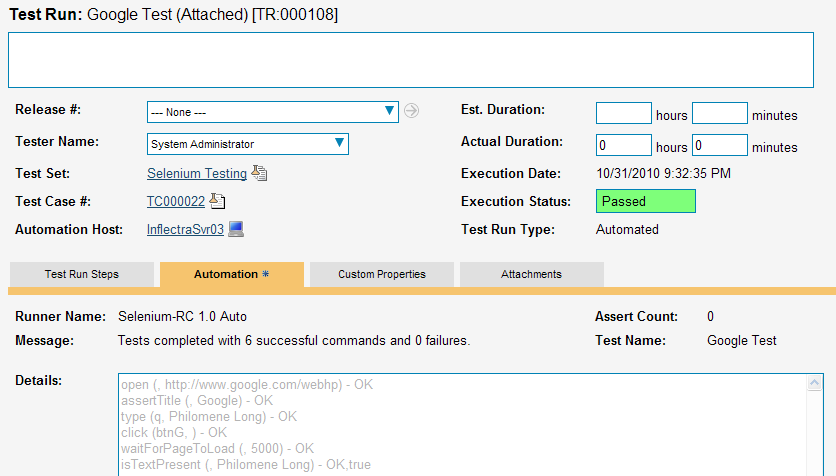
This screen indicates the status of the test run that was reported back from Selenium together with any messages or other information. The execution status will be set to PASSED if all the Selenium commands report back OK and all the tests passed. If any of the commands failed or the tests don't pass, the overall execution status will be listed as FAILED.
The Message field will contain a summary of the number of commands executed and the number of failed commands, with the large details box containing the full command execution log as reported back from Selenium:
open (, http://www.google.com/webhp) - OK
assertTitle (, Google) - OK
type (q, Philomene Long) - OK
click (btnG, ) - OK
waitForPageToLoad (, 5000) - OK
isTextPresent (, Philomene Long) - OK,true
Congratulations... You are now able to run Selenium automated web tests and have the results be recorded within SpiraTest / SpiraTeam.